Open IBM Cognos Connection:
Start your Web browser.
In the address bar, type the URL supplied by your administrator, and then press Enter. The URL looks something like this:
http://servername/cognos8
In the IBM Cognos 8 Welcome page, click Query my data, and select the GO Data Warehouse (analysis) package.
A blank report appears.
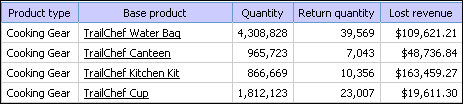
Add columns to the report:
From the Menu, click Insert Data.
Expand Sales and Marketing (analysis), expand Sales, Product, and drag Product type and Base product to the work area.
The work area is the area within a studio that contains the report, analysis, query, or agent that you are currently using.
From Sales, expand Sales fact, and drag Quantity and Unit cost to the work area.
The item Unit cost will not appear in the final report, but you need it to build a calculation.
Expand Returned items, and Returned items, and drag Return quantity to the work area.
Create a calculation to show the lost revenue (Return quantity * Unit cost = Lost revenue):
Select the column headings that you want for the calculation. In the work area, click the heading for Return quantity and Ctrl+click the heading for the Unit cost column.
Click the calculate button
 .
.In the Operation box, select * (multiplication).
In the New item name box, type Lost revenue.
Click Insert.
Delete the Unit cost column.
Format the calculated column that you added:
Right-click the heading for the Lost revenue column and click Format Data.
In the Category list, click Currency.
In the Thousands separator list, click Yes, and then click OK.
Create a calculation to show the percentage of returns (Return quantity / Quantity)*100):
In the work area, click the heading for the Return quantity column, and Ctrl+click the heading for the Quantity column.
Click the calculate button.
In the Operation type box, select Percentage.
The content of the Operation box changes to %.
In the New item name box, type % Returned.
Click Insert.
Sort the % Returned column in descending order:
Right-click the heading for the % Returned column, and click the sort button
 .
.Under Sort order, click Descending (9 to 1), and then click OK.
Apply conditional formatting to highlight products with a lost revenue greater than $200,000:
Click the heading for the Lost revenue column.
From the Menu, click Change Layout, and click Define Conditional Styles.
In the New value: box, type 200000, and click Insert.
For the first range, in the Style column, select Poor, and click OK.
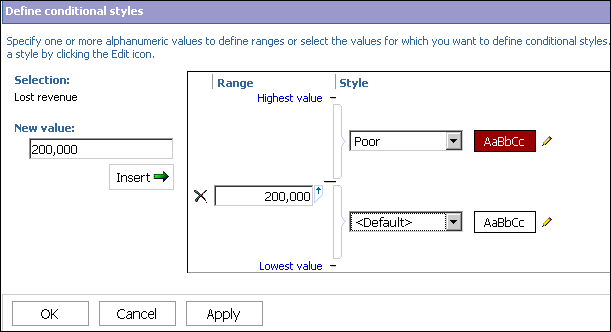
The cells with a lost revenue greater than $200,000 appear with a red background.
Apply a template to the report:
From the Menu, click Change Layout, and click Apply Template.
Select Apply a template, and click Select a template.
In Public Folders, click Sample Template, select Great Outdoors Template, and click OK twice.
The report appears with the styles from the template.
Add a title to the report:
Above the report, click the report title.
In the Title box, type Returns by Product Type, and click OK.
Save the report:
From the toolbar, click the save button.
In the Name box, type Returns by Product Type.
Accept the default save location, and click OK.
The final report looks like this:
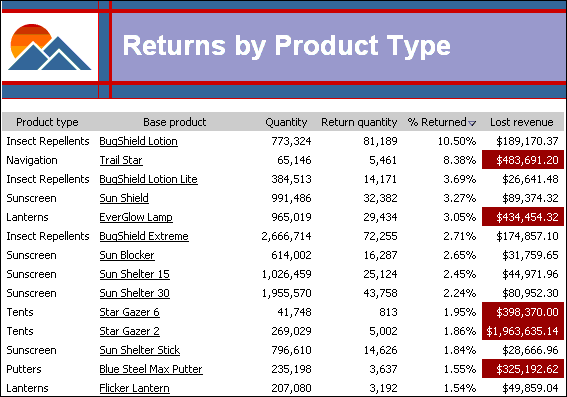
Notice that the Star Gazer 2 tent has the highest lost revenue rate.
