Open IBM Cognos Connection:
Start your Web browser.
In the address bar, type the URL supplied by your administrator, and then press Enter. The URL looks something like this:
http://servername/cognos8
In the IBM Cognos 8 Welcome page, click Create professional reports.
Click the GO Data Warehouse (analysis) package.
Click Create a new report, click Financial, and click OK.
Tip: If you are in Report Studio Professional, switch to Report Studio Express for this example. From the View menu, click Authoring Mode, and click Express.
Insert data in the crosstab zones:
In the Insertable Objects pane, expand Finance (analysis), Finance, Account, Account(All), and Balance sheet (total).
From Balance sheet (total), drag Assets (total) to the Rows zone.
From Balance sheet (total), expand Liabilities & equities (total), and drag both Liabilities (total) and Equity (total) to the Rows zone, under the Assets (total).
Tip: When you drag an object to the crosstab, you will see a flashing horizontal or vertical bar. This indication tells you where the item will be placed in the crosstab.
In the Insertable Objects pane, expand Submission, and Submission(All), and drag 2006 Actual results in USD to the Columns zone.
Drag 2005 Actual results in USD to the Columns zone, to the right of 2006 Actual results in USD.
In the Insertable Objects pane, expand Time dimension, Time dimension(All), 2006, and Q4, and drag December to the Columns zone, under the 2006 Actual results in USD.
Expand 2005 and Q4, and drag December to the Columns zone, under the 2005 Actual results in USD.
From Finance (analysis), expand Finance, and Finance fact, and drag Amount (year to date) to the Measures zone.
Expand the rows to view the company’s breakdown of assets, liabilities, and equity:
In the report, double-click Assets (total) to examine the members of the company’s assets.
Repeat for Liabilities (total) and Equities (total).
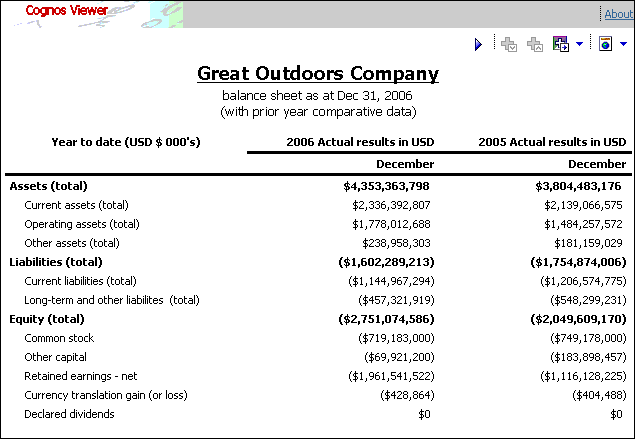
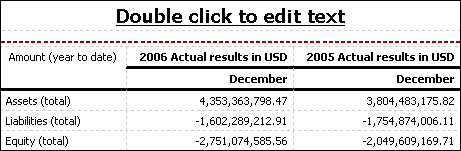
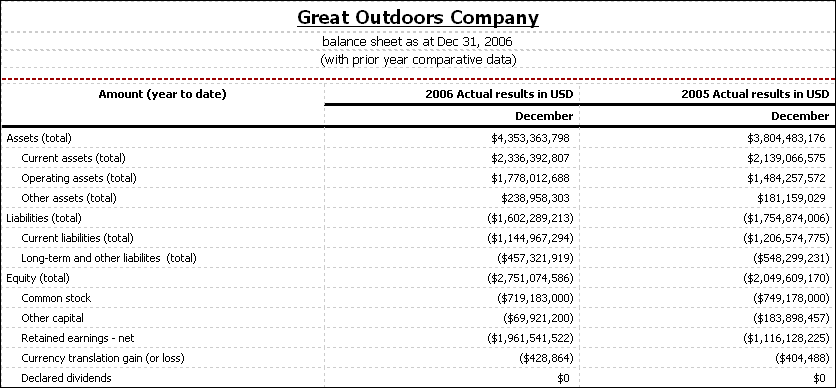
Change the title of the report to reflect the contents of the balance sheet:
Double-click the heading title, type Great Outdoors Company, and click OK.
On the Toolbox tab, drag the Block object under the Great Outdoors Company title. Repeat the steps to add a second block underneath the first.
On the Toolbox tab, drag the Text Item object inside the first block object. When the Text dialog box appears, type balance sheet as at Dec 31, 2006, and click OK.
Repeat the steps in the previous bullet to add a second text item object to the second block object. In the Text dialog box, type (with prior year comparative data), and click OK.
Ctrl+click both block objects, and, using the toolbar, change the font to size 10 pt and center the text.
Change the currency format of the balance sheet:
In your report, under the 2005 Actual results in USD, under December, use Shift+click to select the whole column.
Right-click the selection, click Style, and click Data Format.
In the Format type list, select Currency.
In the Properties pane, click the Currency property, and select $(USD) - United States of America.
Click the No. of Decimal Places property, and then select 0.
Click OK.
Use the pick up style button  to repeat the previous step for the column
under 2006:
to repeat the previous step for the column
under 2006:
To copy all the formatting applied to the item, click the pick up style button, click the items that you want to format, and then click the apply style button
 .
.To copy only one of the formatting styles, click the down arrow to the right of the pick up style button and click the style that you want to copy. Then, click the item that you want to format and click the apply style button.
If you want to make changes to a style that you copied, click the down arrow to the right of the pick up style button and click Edit Dropper Style. In the Style dialog box, specify basic and advanced style characteristics, and then click OK.
Change text formatting to reflect a standard balance sheet:
Ctrl+click to select the entire row for each of Assets (total), Liabilities (total) and Equity (total). Using the toolbar, change the text to bold.
Right-click Amount (year to date) and click Override Default Text. In the text box, type Year to date (USD $000’s), and click OK.
Select Year to date (USD $000’s) and, using the toolbar, change the text to bold.
From the Run menu, click Run Report - HTML.